By Carole Osborne
Nagging, like an animal gnawing; sharp, like a piercing knife; throbbing, like a smashed fingertip. These are all samples of how low-back pain can feel to suffering clients. The common complaint of lumbar pain is often the result of myofascial tension, distortion, and dysfunction. Therapists need a clear understanding of, and a straightforward approach to, addressing lumbar pain. By using the gentle, but penetrating approach of deep-tissue sculpting, your ability to observe structural organization and to direct your clients toward appropriate activities and self-care will improve
The Hows and Whys of Lumbar Pain
Typically, clients complaining of low-back pain will present with lumbosacral misalignment, characterized by excessive (lordosis) or flattened lumbar curvature, anterior or posterior pelvic tipping, and/or rotations and uneven iliac crest heights. Observe your clients’ personal tension patterns. Their spinal extensor muscles will usually appear as tight, wiry ridges next to the spine. The lumbodorsal fascia will feel bound to neighboring tissue layers. Your goal will be to relieve the lumbar spine compression that is the result of these chronically shortened myofascia.
Often tight hamstrings and quadriceps, as well as hypotoned or hypertoned abdominals and iliopsoas muscles, contribute to low-back tension. Your clients will often appear to be so compacted at the lumbar level that their bodies’ weight will not settle through the pelvis into the legs. It is almost as though the legs are not fully functioning as connectors to the ground; they seem, instead, to be the legs on a stick figure. They need posterior length, anterior to posterior balance, and continuity in function between their torso and lower extremities. This should be the other goal of your session together.
Inefficient breathing patterns also exacerbate low-back pain. Shallow chest breathing and hyperventilation limit the amount and quality of spinal movement. Without the rhythmic waves involved in deep, abdominal expansion during full inhalation and exhalation, the spine can become rigid and inflexible. Because the crural attachments are intimately woven beside the psoas at the anterior lumbar spine, a tense diaphragm can transfer restriction and pain throughout the abdominal and lumbar regions.
Conversely, lower torso tension can significantly limit breathing. Abdominal tension can prevent full excursion of the diaphragm by minimizing room for the necessary expansion of the rib cage and displacement of the abdominal organs during inhalation. Other posterior muscles, including serratus posterior inferior and superior and levator costarum, influence respiratory depth and ease. When these smaller, more intrinsic muscles are restricted, the rib cage cannot expand to achieve its maximum posterior and lateral excursion.
Of course, you will also need to consider any underlying conditions, such as muscular strains and sprains, damaged or stressed discs, arthritis, or other inflammatory conditions 1 that may be present. And pregnant and postpartum women’s backs are a story all their own. 2 As you get your mind around an individual client’s condition, remember these contributing factors and adapt your technique accordingly when working with these clients.
Chronic Myofascial Restriction
So, how will you actually touch this client’s needy body? A full-body or deep, localized Swedish massage? Passive and active resisted stretching? Extinguishing relevant trigger points? All these therapeutic approaches would possibly be effective, but for our purposes here, we are going to zero in on the use of focused compression, sustained sufficiently to soften and change both muscular and connective tissue of relevant structures. I call my style of this type of bodywork deep-tissue sculpting.
Sculpting is a form of deep-tissue massage characterized by firm, constant compressions and strokes applied parallel to the muscle fibers. Like other myofascial bodywork methods, the techniques are intended to affect the deeper musculoskeletal structures, as well as the more superficial structures. In order to reach these deeper layers, you will use fingertips, knuckles, elbows, forearms, and heels of the hand, or any bony body part as tools. Pressure is gradually applied to a tight area until a resistance is met.
You will maintain constant pressure while the tissue relaxes and until release is completed, or until you accept that no change is forthcoming. Any pain experienced by the client should not exceed pleasure, hovering at the borderline of pain. Don’t use lubricants, so that the work can proceed slowly, allowing fascial softening and muscular lengthening. Generally, a minimum of 30–60 seconds is needed to elicit long-lasting myofascial change. This more extended time commitment also helps the client assimilate the deeper pressures, as well as the intensity of physical sensations and emotions that can occur.
When doing deep-tissue sculpting, imagine yourself as a sculpting artist. Figuratively carve away that which is not the essence of the human body, much as a sculptor would remove from a lump of clay or slab of stone that which is not the essence of the object she is creating. Hold a mental picture of the muscle or fascial sheath sculpted as it appears in the anatomy books. Imagine the myofascia as free of bunched, constricted, or disorganized areas, and intend your hands to create that. More specifically, incorporate imagery to guide your sculpting.
Now let’s get into our lumbar pain session work and see what it might look like.
Opening a Session
As always, open your session with appropriate contact and evaluation techniques. Observe and evaluate your client to guide you in determining the appropriateness and efficacy of each of the techniques: feel free to omit some and emphasize others.
You can direct your work by holding a mental image as a guiding thought while working. For a low-back pain client, imagine elongating the client’s back and connecting the torso and legs. Create a mental picture of lengthened spinal extensors and continuity between the client’s hamstrings and pelvic myofascia, as well as between the abdominals and anterior thigh. Imagine lengthening fluidly through the quadratus lumborum and iliopsoas myofascial connections between the pelvis and the legs. You might also engage your client to imagine this elongation and connection as you work together.
Throughout the session, augment your sculpting with sequences from other modalities and include movement or stretches that further your intention and provide transitions between sculpting that are uniquely created for your individual client. Watch your use of lubricants and sequence of procedures so that you can sculpt without slipping; this will help ensure sufficient myofascial traction to get a “fuller” connection with these tissues. There are other soft-tissue therapies you might integrate or blend together to further enhance this sculpting work. Remember to bring closure to your work with techniques that integrate the remainder of your client’s body.
Deep-Tissue Procedures
Position the client prone or sidelying for the first four procedures. Use your elbow, forearm, fist, knuckle, or finger, depending on your size and your client’s and the depth of structure to be sculpted. Dashed lines on photos represent areas to sculpt; solid arrows denote vector of pressure to apply.
1. Lengthening the Back (image 1) intention and imagery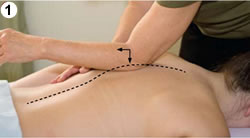
To elongate and relax the muscles and fascia attaching to and paralleling the spine, primarily trapezius, thorocolumbar aponeurosis, rhomboids, erector spinae, and posterior fascial sheaths.
PROCEDURE
From a position in front of the client’s head, begin stroking/compressing along the tissue lateral to the spine. Continue from near the C–7 area to the sacral base, changing tools as the muscles narrow above and over the sacrum.
PRECAUTIONS
- Do not stroke directly over spinous processes
- In the lumbar area, be sure to direct pressure more toward the sacrum than anterior, to avoid excessively curving the lower back.
- If lumbar lordosis is extreme, support under the abdomen. Or, do this and all other prone procedures with the client in a sidelying position.
 HINTS
HINTS
Work both simultaneously, or left then right sides of the back. Do not force an unbroken stroke if the tissue is not elongating. A series of compressions is equally as effective and a combination of stroking and compressions will more likely be the pattern of release. Change tools as needed to accommodate body position and to avoid excessive leaning over the table.
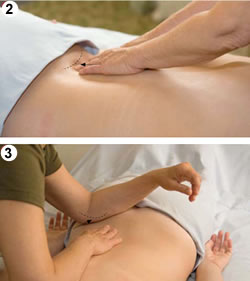
2. Defining the superior and inferior iliac crest (images 2 and 3) intention and imagery
To create skeletal awareness of the pelvis at the iliac crest by releasing tension in the attaching muscles and fascial sheaths, as well as elongating the back.
PROCEDURE
Compress superior to the iliac crest, beginning near the lumbosacral joint, and progress laterally, making a series of compressions. If the tissue yields sufficiently, melt through and release the thorocolumbar aponeurosis, the erector spinae, the quadratus lumborum, and the transverse and oblique abdominals. Next, compress inferior to the iliac crest, beginning near the lateral side of the posterior iliac spine and progress laterally making a series of compressions. If the tissue yields sufficiently, melt through and release the attachments of the gluteus medius. Do this on one side of the body, then the other.
3. Defining the Sacrum and releasing the gluteal myofascia (image 4) intentions and 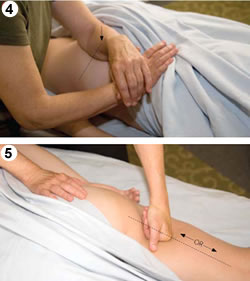 imagery
To create skeletal awareness of the sacrum, and elongation of the gluteus maximus myofascia using an image of connecting torso to legs.
PROCEDURES
First, compress along the lateral sacral border, releasing tension in the gluteus maximus attachments to make contact with the bone. Make a series of compressions, moving inferior along the sacrum, to near the coccyx. Then compress and/or stroke the gluteus maximus from origin toward the insertion, elongating and melting the muscle and fascia. Do this on one side of the body, then the other.
PRECAUTIONS
- The sciatic nerve is embedded beneath the gluteus maximus and may be sensitive to deep compressions. Change position, direction, or depth of pressure if the client experiences an electrical, burning, numbing, or painful sensation down the posterior leg.
- Be especially sensitive near the coccyx to slowly melt to depth, particularly if there has been any previous coccygeal injury.
4. Lengthening the hamstring group myofascia (image 5) intentions and imagery
To elongate the hamstring muscle group and investing fascia, as well as realign the ischial tuberosities from any anterior displacement.
PROCEDURES
Begin with a compression on the ischial tuberosity. Continue with a series of compressions or a slow melting stroke down the hamstring group to just above the knee, where the muscles separate to attach laterally. Finish with smaller tools sculpting the tibial and fibular attachments. If you prefer, work from the knee toward the ischial tuberosity. Do this on one side of the body, then the other.
PRECAUTIONS
Remember to avoid deep pressure on varicose veins and redirect sculpting to move in a distal to proximal direction. Eliminate sculpting in this area entirely if severe bulging or ropy varicose veins are present. Avoid direct pressure in the popliteal area of the posterior knee.
5. Lengthening of the quadriceps group myofascia (image 6) intentions and imagery
To elongate the quadriceps group and its investing fascia, release the anterior superior iliac spine (ASIS) from any posterior displacement and connect the torso and legs.
PROCEDURES
Position the client supine. Begin compressing the rectus femoris origin just below the ASIS. Follow any elongating release distally, or make a series of compressions to just proximal of the patella. Repeat on the vastus medialis and lateralis. Use a smaller tool to sculpt the quadriceps attachments at each side of the patella, then similarly sculpt the other leg. If you prefer, work from the knee toward the pelvis.
PRECAUTIONS
- Avoid deep pressure on varicose veins and redirect sculpting to move in a distal to proximal direction.
- Eliminate sculpting in this area entirely if severe, bulging, or ropy varicose veins are present.
6. Abdominals Release (image 7) intention and imagery
To reduce tension in the rectus, oblique, and transverse abdominus muscles and shorten their interwoven fascia.
PROCEDURES
Position the client supine. Use the heel of your hand to compress gently into the abdominal muscles, especially along each edge of the rectus. Make a series of compressions to release the entire abdomen. Carefully compress from near the sternal xyphoid process and along the inferior edge of the rib cage, releasing the abdominals, especially the rectus and oblique abdominals. Similarly sculpt along the other side of the distal rib cage.
PRECAUTIONS
- Melt slowly to avoid painful pressure on abdominal organs.
- Do not use this procedure on pregnant or menstruating women, nor with anyone experiencing undiagnosed abdominal pain. 3
- Avoid painful pressure on the floating 11th rib by ending the rib cage compressions at the end of the costal cartilages.
7. Anterior flat of the ilium (image 8) intentions and imagery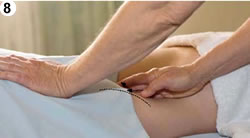
To create skeletal awareness of the pelvis and iliopsoas myofascia and deep release and receptivity into the abdominal muscles.
PROCEDURES
Position the client supine. Begin near the anterior superior iliac spine, compressing medial and toward the pubic ramus. Melt slowly and gently into the abdominals then iliacus, proceeding as the myofascia yields as if “skiing” down the slope of the iliac bowl. If release allows you to contact the psoas muscle, continue in an inferior direction releasing any stringiness, bunching, or tenderness there. Similarly sculpt the other side. This procedure may also be done with the client sidelying.
PRECAUTIONS
- By entering at the ASIS, keeping the palmar side of your fingers against the flat of the ilium, and reducing pressure if painful, you will avoid any pointed or excessive pressure on the abdominal organs.
- Be especially sensitive to wait for the client’s release and to avoid working beyond his experience of the “pleasure/pain borderline.”
- Do not apply direct pressure in an inferior direction on the inguinal ligament as it may be weakened and would then encourage herniation.
- Do not use this procedure on pregnant or menstruating women, or with any client experiencing undiagnosed abdominal pain. Delay application with postpartum women for 8–10 weeks after childbirth. 4
8. Quadratus Lumborum Stretch (image 9) intention and imagery
To release the quadratus, imagining more space between the ribs and iliac crest, and lengthen the back.
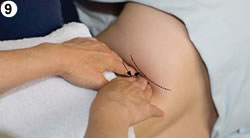
PROCEDURE
Do this final procedure with the client sidelying, first on one then the other side. Use the forearm or fingertips to compress in a medial and inferior direction on the quadratus.
HINTS
If your forearm is too wide or you can’t locate the muscle belly, work using your fingertips.
Strokes to Emphasize for Individual Imbalances
Those clients with excessive lumbar curvatures (lumbar lordosis) benefit most from sculpting of the posterior fascia, erector spinae, quadriceps group, and the muscles attaching at the sacrum, iliac crest, and anterior surface of the ilium. When your client’s alignment reveals a flattened lumbar curve, emphasize sculpting the gluteals and hamstring groups. To change pelvic alignment sufficiently to reduce muscle strain and spasm, encourage iliopsoas toning and stretching. Relax the quadratus lumborum on the higher side to balance uneven iliac crest heights. To release scoliosis, sculpt thoroughly and in detail on the erector spinae, especially on the sides inside the S-curve. The quadratus lumborum also will benefit from careful sculpting. 5
Supportive Activities and Stretching
In addition to your table work, your client may need guidance in daily exercise, activities, and other ways to reinforce the changes experienced. If there’s some residual pain, show him how to find a comfortable resting position. 6 As pain subsides, encourage him to improve balance and strength in the iliopsoas, abdominals, erector spinae, quadriceps, and hamstring muscles. Practice pelvic tilting in lying, standing, and on all-fours positions. This uses the iliopsoas for pelvic positioning on the frontal plane and strengthens this muscle unit. Knee-to-chest stretches elongate lumbar and the hamstring myofascia. 7 Another option is to actively stretch the quads and hamstring muscle groups after 2–5 seconds of muscle use against resistance. 8 Healthy backs can benefit from more strenuous exercise and stretching, including yoga and movements that twist, rotate, flex, and extend the spine. 9
You may need to evaluate the daily activities of low-back pain clients, as well as their environments and habits, to eliminate other factors contributing to their pain. 10 While lumbar pain is a physical experience, most somatic psychologies suggest that tightened pelvic muscles reflect a need for control. These areas can harbor fear—of life, vitality, and sexuality. Nerves emerging from the lumbar spine activate the sexual and eliminative functions, as well as the legs and feet. Rigidity and imbalance here can block the pelvis from free movement, thereby inhibiting fluid walking, dancing, and sexual expression. Since lumbar alignment is a function of balance between the anterior and posterior musculature, consider some abdominal correlations too. Issues of nourishment and assimilation of emotions, as well as food, can settle here. Thus, lumbar tension might more fully resolve if a client is willing to explore his unexpressed emotions concerning nurturance and sexuality. 11
Conclusion
Low-back pain ranks second to acute respiratory illness as a cause of time lost from work. 12 Some surveys estimate that 80 percent of all people will be affected by back pain some time during their lives, and it appears that massage therapy can help them. 13, 14, 15 Your next week’s client list will likely include several low-back pain sufferers. With this overview of the condition in mind and this hour-long protocol of deep-tissue techniques in your hands, you’ll be ready to reduce their discomfort in a penetrating, yet sensitive way.
[minti_divider style=”1″ icon=”” margin=”60px 0px 60px 0px”]
Carole Osborne-Sheets is the author of and Pre- and Perinatal Massage Therapy, and a contributor to the upcoming textbook Teaching Massage Therapy, as well as numerous other publications. She is the 2008 recipient of the AMTA Jerome Perlinski National Teacher of the Year Award. The work outlined in this article is adapted from portions of the author’s textbook Deep Tissue Sculpting.
For these and other books, click here.
For information about her certification program, Pre- and Perinatal Massage Therapy, and other hands-on workshops, click here.
[minti_divider style=”1″ icon=”” margin=”60px 0px 60px 0px”]
Footnotes
- Carole Osborne-Sheets, Deep Tissue Sculpting, 2nd ed. (San Diego: Body Therapy Associates, 2002), 39–44.
- Carole Osborne-Sheets, Pre- and Perinatal Massage Therapy (San Diego: Body Therapy Associates, 1998), 12–16.
- Ibid., 36–38.
- Ibid., 135.
- For another insightful look at myofascial lengthening in the low-back area, see Doug Alexander, “Lengthening Stereotypes,” Massage Therapy Journal 38, no. 2 (Summer 1999): 40–54.
- Maggie Leavin, Maggie’s Back Book: Healing the Hurt in Your Lower Back, (Boston: Houghton Mifflin Co., 1976).
- For a Feldenkrais approach to low-back care, see David Zemach-Bersin, Kaethe Zemach-Bersin, and Mark Reese, Relaxercise, (New York: HarperCollins Publishers, 1990).
- Aaron L.Mattes and Suzanne T. Mattes, Active Isolated Stretching: The Mattes Method (Aaron Mattes Therapy, 2006).
- Oscar Ichazo, Psychocalisthenics: Master Exercise (Sequoia Press, 1993).
- Leavin, ibid.
- Kenneth Dychtwald, Body/Mind (New York: G.P. Putnam’s Sons, 1986), especially Chapter 5.
- Postgraduate Medicine Journal, 1981.
- C.M. Godfrey, P.P. Morgan, and J. Schatzker, “A randomized trial of manipulation for low-back pain in a medical setting,” Spine 9 (1984): 301–4.
- Tiffany Field, Iris Burman, et al., International Journal of Neuroscience 106 (2001): 131–45.
- D. C. Cherkin, D. Eisenber, K.J. Sherman, W. Barlow, T.J. Kaptchuck, J. Street, and R.A. Deyo, “Randomized trial comparing traditional Chinese medical acupuncture, therapeutic massage, and self-care education for chronic low-back pain,”Archives of Internal Medicine 161 (2001): 1081–8.
How to Conduct a Pre-session Massage Therapy Interview
VideosPresent and former students recant the joys of working with Carole Osborne
VideosMaternity Massage: The Benefits of Prenatal and Perinatal Touch
ArticlesContribution to Midwife International by Carole Osborne, 2013
As midwives, it is important that we are able recommend supplementary care to make pregnancy and postpartum as comfortable as possible for the women we serve. In this piece, Carole Osborne, an internationally recognized maternity massage therapist and instructor, shares some of the benefits of prenatal and perinatal massage, and what makes this kind of care effective for mothers-to-be. She also gives direction for finding an effective maternity massage therapist for you to partner your midwifery care with.
Expecting a baby is usually joyful, but, as we know, it can also be stressful. A woman changes dramatically, and some of these changes are uncomfortable. Prenatal massage uses techniques designed specifically to make healthier moms and babies, despite pregnancy’s challenges, and to enhance its joys. Recent research is beginning to show that prenatal massage therapy may have these benefits:
After giving birth, postpartum massage therapy may help abdominal recovery, reduce the strain of baby care on mom’s body, support satisfying breast feeding, and nurture mom and her family. Moms more quickly and fully touch their babies in loving, nurturing ways, after receiving massage, and that leads to a more peaceful world for us all.
In recent years, thousands of American massage therapists have trained to become pre- and perinatal massage therapy specialists. However, nurturing touch during pregnancy, labor, and the postpartum period is not a new concept. Midwives have been valued for centuries for their highly developed hands-on skills. Massage and movement during the childbearing experience was and continues to be a prominent part of many cultures’ maternity care. Most of the world’s more peaceful cultures use touch prominently during pregnancy and early childhood.
How Is Prenatal Massage Therapy Effective?
Changes during pregnancy span the psychological, physiological, spiritual and social realms. A typical session performed by a therapist specializing in pre- and perinatal massage therapy can address pregnancy’s various physical challenges: postural changes, pain in the lower back, pelvis hips, or ribs, and edema. The stress-reducing effect of massage not only may relax mom, but it may also improve uterine blood supply and fetal and maternal outcomes. Prenatal massage therapy also may facilitate ease of labor by preparing selected musculature and joints to either soften or support during childbirth.
Beyond these physical effects, an effective pregnancy massage therapy session provides emotional support. In the safe care of a focused, nurturing therapist, many women unburden their fears and other childbearing worries. Therapeutic massage and bodywork may help the mother-to-be develop the sensory awareness necessary to birth more comfortably and actively. If laboring women whose partners learned and provided basic massage strokes to their backs and legs had shorter, less complicated labors, imagine the benefits that might be generated by the skilled hands and compassionate heart of a trained touch specialist!
The Postpartum Period
Beginning with the baby’s birth, a new mother must cope with many changes. She weighs less, yet still habitually holds her body for an anterior weight load posture. A postpartum massage therapy session may facilitate a gentle return to the body’s pre-pregnancy functioning, alleviate pain and to bring about a renewed sense of body and self. Upper back muscles, which now support larger breasts and the carried infant’s weight, appreciate massage to reduce strain and to help maintain flexibility despite the physical exertion and repetitiveness of infant feeding and care.
Regardless of methodology, an hour focused on her own relaxation and comfort works wonders for a new mom’s mood. Another empathetic ear hearing her birth story may further resolve any residual emotional conflicts that can emerge during labor and early mothering. Several recent studies suggest that massage therapy may help prevent or reduce prenatal and postpartum depression. For post-cesarean mothers, specific therapeutic techniques also may reduce scar tissue formation and facilitate the healing of the incision and related soft tissue areas, as well as support the integration of her childbearing experience.
Identifying Qualified Pre- and Perinatal Massage Therapists
Parents and childbirth professionals will want both a safe and effective massage therapist. Seek out a maternity massage therapy specialist, not just a general massage therapist. A certified specialist is knowledgeable and also skillful in adapting her techniques to safely meet women’s needs. She will approach her pre- and perinatal clients with deep respect for the normalcy of pregnancy, its joys and its many challenges.
When identifying maternity massage therapists, look for those who observe detailed, research-based protocols and contra indications. A comprehensive hands-on training in prenatal and perinatal massage therapy requires at least 32 hours; ideally it also includes a performance evaluation to certify the therapists’ proficiency. Maternity specialists have the knowledge and skills to collaborate well with perinatal health care providers to offer effective and empathetic touch to moms. After seeing their greater comfort, midwives and other providers might even find themselves scheduling their own hour of timeless, nurturing touch!
Top 10 Tips for Great Side Lying Positioning
VideosHow to Perform Breast Draping for Side Lying Massage
VideosIntroduction to Continuing Education Offerings
VideosHow to Network with Fertility Experts in the Medical Realm
ArticlesExperienced perinatal massage therapists develop professional relationships with fertility treatment experts primarily in three methods: their patients, their staff members and through educational activities.
The easiest route to doctors, licensed acupuncturists, psychotherapists and other providers is through their patients. If you have a client undergoing fertility treatments, ask her to share the benefits she feels from your work with her doctor.
Read entire article
Pregnancy Massage
ArticlesThe more we start to understand about the benefits of massage therapy, the more opportunity opens up for massage therapy professionals—in a wide variety of environments. When thinking about where you’d like to practice, having as much information about the options available can help you choose a work environment, or environments, that fit both your personal and professional goals. In the following, you’ll find information ranging from what you can expect when working with pregnant women to the demands of working with women in labor to how you can market maternity massage. In this snapshot, you’ll get an inside look at working with this demographic so you can make informed decisions about where you want to take your massage therapy career.
Read entire article
Maternity Massage Therapy – For Pregnant, Laboring and Postpartum Women
ArticlesMaternity-massage therapy is one of the most personally rewarding and professionally satisfying massage therapy specializations. Maternity massage addresses the many needs of women throughout an entire childbearing cycle, rather than just during pregnancy. If you are considering entering the world of bellies roiling with life, labor’s powerful groans and the sweetness of a mom embracing her newborn, you will need a sense of what this really entails.
Read entire article (PDF)
Ah, What Relief! Deep Tissue Sculpting for Lumbar Pain
ArticlesBy Carole Osborne
Nagging, like an animal gnawing; sharp, like a piercing knife; throbbing, like a smashed fingertip. These are all samples of how low-back pain can feel to suffering clients. The common complaint of lumbar pain is often the result of myofascial tension, distortion, and dysfunction. Therapists need a clear understanding of, and a straightforward approach to, addressing lumbar pain. By using the gentle, but penetrating approach of deep-tissue sculpting, your ability to observe structural organization and to direct your clients toward appropriate activities and self-care will improve
The Hows and Whys of Lumbar Pain
Typically, clients complaining of low-back pain will present with lumbosacral misalignment, characterized by excessive (lordosis) or flattened lumbar curvature, anterior or posterior pelvic tipping, and/or rotations and uneven iliac crest heights. Observe your clients’ personal tension patterns. Their spinal extensor muscles will usually appear as tight, wiry ridges next to the spine. The lumbodorsal fascia will feel bound to neighboring tissue layers. Your goal will be to relieve the lumbar spine compression that is the result of these chronically shortened myofascia.
Often tight hamstrings and quadriceps, as well as hypotoned or hypertoned abdominals and iliopsoas muscles, contribute to low-back tension. Your clients will often appear to be so compacted at the lumbar level that their bodies’ weight will not settle through the pelvis into the legs. It is almost as though the legs are not fully functioning as connectors to the ground; they seem, instead, to be the legs on a stick figure. They need posterior length, anterior to posterior balance, and continuity in function between their torso and lower extremities. This should be the other goal of your session together.
Inefficient breathing patterns also exacerbate low-back pain. Shallow chest breathing and hyperventilation limit the amount and quality of spinal movement. Without the rhythmic waves involved in deep, abdominal expansion during full inhalation and exhalation, the spine can become rigid and inflexible. Because the crural attachments are intimately woven beside the psoas at the anterior lumbar spine, a tense diaphragm can transfer restriction and pain throughout the abdominal and lumbar regions.
Conversely, lower torso tension can significantly limit breathing. Abdominal tension can prevent full excursion of the diaphragm by minimizing room for the necessary expansion of the rib cage and displacement of the abdominal organs during inhalation. Other posterior muscles, including serratus posterior inferior and superior and levator costarum, influence respiratory depth and ease. When these smaller, more intrinsic muscles are restricted, the rib cage cannot expand to achieve its maximum posterior and lateral excursion.
Of course, you will also need to consider any underlying conditions, such as muscular strains and sprains, damaged or stressed discs, arthritis, or other inflammatory conditions 1 that may be present. And pregnant and postpartum women’s backs are a story all their own. 2 As you get your mind around an individual client’s condition, remember these contributing factors and adapt your technique accordingly when working with these clients.
Chronic Myofascial Restriction
So, how will you actually touch this client’s needy body? A full-body or deep, localized Swedish massage? Passive and active resisted stretching? Extinguishing relevant trigger points? All these therapeutic approaches would possibly be effective, but for our purposes here, we are going to zero in on the use of focused compression, sustained sufficiently to soften and change both muscular and connective tissue of relevant structures. I call my style of this type of bodywork deep-tissue sculpting.
Sculpting is a form of deep-tissue massage characterized by firm, constant compressions and strokes applied parallel to the muscle fibers. Like other myofascial bodywork methods, the techniques are intended to affect the deeper musculoskeletal structures, as well as the more superficial structures. In order to reach these deeper layers, you will use fingertips, knuckles, elbows, forearms, and heels of the hand, or any bony body part as tools. Pressure is gradually applied to a tight area until a resistance is met.
You will maintain constant pressure while the tissue relaxes and until release is completed, or until you accept that no change is forthcoming. Any pain experienced by the client should not exceed pleasure, hovering at the borderline of pain. Don’t use lubricants, so that the work can proceed slowly, allowing fascial softening and muscular lengthening. Generally, a minimum of 30–60 seconds is needed to elicit long-lasting myofascial change. This more extended time commitment also helps the client assimilate the deeper pressures, as well as the intensity of physical sensations and emotions that can occur.
When doing deep-tissue sculpting, imagine yourself as a sculpting artist. Figuratively carve away that which is not the essence of the human body, much as a sculptor would remove from a lump of clay or slab of stone that which is not the essence of the object she is creating. Hold a mental picture of the muscle or fascial sheath sculpted as it appears in the anatomy books. Imagine the myofascia as free of bunched, constricted, or disorganized areas, and intend your hands to create that. More specifically, incorporate imagery to guide your sculpting.
Now let’s get into our lumbar pain session work and see what it might look like.
Opening a Session
As always, open your session with appropriate contact and evaluation techniques. Observe and evaluate your client to guide you in determining the appropriateness and efficacy of each of the techniques: feel free to omit some and emphasize others.
You can direct your work by holding a mental image as a guiding thought while working. For a low-back pain client, imagine elongating the client’s back and connecting the torso and legs. Create a mental picture of lengthened spinal extensors and continuity between the client’s hamstrings and pelvic myofascia, as well as between the abdominals and anterior thigh. Imagine lengthening fluidly through the quadratus lumborum and iliopsoas myofascial connections between the pelvis and the legs. You might also engage your client to imagine this elongation and connection as you work together.
Throughout the session, augment your sculpting with sequences from other modalities and include movement or stretches that further your intention and provide transitions between sculpting that are uniquely created for your individual client. Watch your use of lubricants and sequence of procedures so that you can sculpt without slipping; this will help ensure sufficient myofascial traction to get a “fuller” connection with these tissues. There are other soft-tissue therapies you might integrate or blend together to further enhance this sculpting work. Remember to bring closure to your work with techniques that integrate the remainder of your client’s body.
Deep-Tissue Procedures
Position the client prone or sidelying for the first four procedures. Use your elbow, forearm, fist, knuckle, or finger, depending on your size and your client’s and the depth of structure to be sculpted. Dashed lines on photos represent areas to sculpt; solid arrows denote vector of pressure to apply.
1. Lengthening the Back (image 1) intention and imagery
To elongate and relax the muscles and fascia attaching to and paralleling the spine, primarily trapezius, thorocolumbar aponeurosis, rhomboids, erector spinae, and posterior fascial sheaths.
PROCEDURE
From a position in front of the client’s head, begin stroking/compressing along the tissue lateral to the spine. Continue from near the C–7 area to the sacral base, changing tools as the muscles narrow above and over the sacrum.
PRECAUTIONS
Work both simultaneously, or left then right sides of the back. Do not force an unbroken stroke if the tissue is not elongating. A series of compressions is equally as effective and a combination of stroking and compressions will more likely be the pattern of release. Change tools as needed to accommodate body position and to avoid excessive leaning over the table.
2. Defining the superior and inferior iliac crest (images 2 and 3) intention and imagery
To create skeletal awareness of the pelvis at the iliac crest by releasing tension in the attaching muscles and fascial sheaths, as well as elongating the back.
PROCEDURE
Compress superior to the iliac crest, beginning near the lumbosacral joint, and progress laterally, making a series of compressions. If the tissue yields sufficiently, melt through and release the thorocolumbar aponeurosis, the erector spinae, the quadratus lumborum, and the transverse and oblique abdominals. Next, compress inferior to the iliac crest, beginning near the lateral side of the posterior iliac spine and progress laterally making a series of compressions. If the tissue yields sufficiently, melt through and release the attachments of the gluteus medius. Do this on one side of the body, then the other.
3. Defining the Sacrum and releasing the gluteal myofascia (image 4) intentions and imagery
To create skeletal awareness of the sacrum, and elongation of the gluteus maximus myofascia using an image of connecting torso to legs.
PROCEDURES
First, compress along the lateral sacral border, releasing tension in the gluteus maximus attachments to make contact with the bone. Make a series of compressions, moving inferior along the sacrum, to near the coccyx. Then compress and/or stroke the gluteus maximus from origin toward the insertion, elongating and melting the muscle and fascia. Do this on one side of the body, then the other.
PRECAUTIONS
4. Lengthening the hamstring group myofascia (image 5) intentions and imagery
To elongate the hamstring muscle group and investing fascia, as well as realign the ischial tuberosities from any anterior displacement.
PROCEDURES
Begin with a compression on the ischial tuberosity. Continue with a series of compressions or a slow melting stroke down the hamstring group to just above the knee, where the muscles separate to attach laterally. Finish with smaller tools sculpting the tibial and fibular attachments. If you prefer, work from the knee toward the ischial tuberosity. Do this on one side of the body, then the other.
PRECAUTIONS
Remember to avoid deep pressure on varicose veins and redirect sculpting to move in a distal to proximal direction. Eliminate sculpting in this area entirely if severe bulging or ropy varicose veins are present. Avoid direct pressure in the popliteal area of the posterior knee.
5. Lengthening of the quadriceps group myofascia (image 6) intentions and imagery
To elongate the quadriceps group and its investing fascia, release the anterior superior iliac spine (ASIS) from any posterior displacement and connect the torso and legs.
Position the client supine. Begin compressing the rectus femoris origin just below the ASIS. Follow any elongating release distally, or make a series of compressions to just proximal of the patella. Repeat on the vastus medialis and lateralis. Use a smaller tool to sculpt the quadriceps attachments at each side of the patella, then similarly sculpt the other leg. If you prefer, work from the knee toward the pelvis.
PRECAUTIONS
6. Abdominals Release (image 7) intention and imagery
To reduce tension in the rectus, oblique, and transverse abdominus muscles and shorten their interwoven fascia.
PROCEDURES
Position the client supine. Use the heel of your hand to compress gently into the abdominal muscles, especially along each edge of the rectus. Make a series of compressions to release the entire abdomen. Carefully compress from near the sternal xyphoid process and along the inferior edge of the rib cage, releasing the abdominals, especially the rectus and oblique abdominals. Similarly sculpt along the other side of the distal rib cage.
PRECAUTIONS
7. Anterior flat of the ilium (image 8) intentions and imagery
To create skeletal awareness of the pelvis and iliopsoas myofascia and deep release and receptivity into the abdominal muscles.
PROCEDURES
Position the client supine. Begin near the anterior superior iliac spine, compressing medial and toward the pubic ramus. Melt slowly and gently into the abdominals then iliacus, proceeding as the myofascia yields as if “skiing” down the slope of the iliac bowl. If release allows you to contact the psoas muscle, continue in an inferior direction releasing any stringiness, bunching, or tenderness there. Similarly sculpt the other side. This procedure may also be done with the client sidelying.
PRECAUTIONS
8. Quadratus Lumborum Stretch (image 9) intention and imagery
To release the quadratus, imagining more space between the ribs and iliac crest, and lengthen the back.
PROCEDURE
Do this final procedure with the client sidelying, first on one then the other side. Use the forearm or fingertips to compress in a medial and inferior direction on the quadratus.
HINTS
If your forearm is too wide or you can’t locate the muscle belly, work using your fingertips.
Strokes to Emphasize for Individual Imbalances
Those clients with excessive lumbar curvatures (lumbar lordosis) benefit most from sculpting of the posterior fascia, erector spinae, quadriceps group, and the muscles attaching at the sacrum, iliac crest, and anterior surface of the ilium. When your client’s alignment reveals a flattened lumbar curve, emphasize sculpting the gluteals and hamstring groups. To change pelvic alignment sufficiently to reduce muscle strain and spasm, encourage iliopsoas toning and stretching. Relax the quadratus lumborum on the higher side to balance uneven iliac crest heights. To release scoliosis, sculpt thoroughly and in detail on the erector spinae, especially on the sides inside the S-curve. The quadratus lumborum also will benefit from careful sculpting. 5
Supportive Activities and Stretching
In addition to your table work, your client may need guidance in daily exercise, activities, and other ways to reinforce the changes experienced. If there’s some residual pain, show him how to find a comfortable resting position. 6 As pain subsides, encourage him to improve balance and strength in the iliopsoas, abdominals, erector spinae, quadriceps, and hamstring muscles. Practice pelvic tilting in lying, standing, and on all-fours positions. This uses the iliopsoas for pelvic positioning on the frontal plane and strengthens this muscle unit. Knee-to-chest stretches elongate lumbar and the hamstring myofascia. 7 Another option is to actively stretch the quads and hamstring muscle groups after 2–5 seconds of muscle use against resistance. 8 Healthy backs can benefit from more strenuous exercise and stretching, including yoga and movements that twist, rotate, flex, and extend the spine. 9
You may need to evaluate the daily activities of low-back pain clients, as well as their environments and habits, to eliminate other factors contributing to their pain. 10 While lumbar pain is a physical experience, most somatic psychologies suggest that tightened pelvic muscles reflect a need for control. These areas can harbor fear—of life, vitality, and sexuality. Nerves emerging from the lumbar spine activate the sexual and eliminative functions, as well as the legs and feet. Rigidity and imbalance here can block the pelvis from free movement, thereby inhibiting fluid walking, dancing, and sexual expression. Since lumbar alignment is a function of balance between the anterior and posterior musculature, consider some abdominal correlations too. Issues of nourishment and assimilation of emotions, as well as food, can settle here. Thus, lumbar tension might more fully resolve if a client is willing to explore his unexpressed emotions concerning nurturance and sexuality. 11
Conclusion
Low-back pain ranks second to acute respiratory illness as a cause of time lost from work. 12 Some surveys estimate that 80 percent of all people will be affected by back pain some time during their lives, and it appears that massage therapy can help them. 13, 14, 15 Your next week’s client list will likely include several low-back pain sufferers. With this overview of the condition in mind and this hour-long protocol of deep-tissue techniques in your hands, you’ll be ready to reduce their discomfort in a penetrating, yet sensitive way.
[minti_divider style=”1″ icon=”” margin=”60px 0px 60px 0px”]
Carole Osborne-Sheets is the author of and Pre- and Perinatal Massage Therapy, and a contributor to the upcoming textbook Teaching Massage Therapy, as well as numerous other publications. She is the 2008 recipient of the AMTA Jerome Perlinski National Teacher of the Year Award. The work outlined in this article is adapted from portions of the author’s textbook Deep Tissue Sculpting.
For these and other books, click here.
For information about her certification program, Pre- and Perinatal Massage Therapy, and other hands-on workshops, click here.
[minti_divider style=”1″ icon=”” margin=”60px 0px 60px 0px”]
Footnotes