Health Maintenance – Preventive Care for Hands and Bodies
As a continuing education teacher working with practitioners from many different schools, I’ve commiserated with the pain and frustration of poor body and hand care. Carpal tunnel, tendonitis, and thoracic outlet syndrome are far too common in our profession. Chronic back, neck, and shoulder pain shorten many a lucrative career. Most of this is preventable, and here’s how.
My 33-year career in bodywork has offered me many lessons. One I learned quickly, in fact in my first two years, was to attend to my own body use and maintenance. When a vague thumb and shoulder achiness began to temper my beginner’s zeal, I discovered how to prevent it from becoming chronically painful. As I learned more efficient use of my body weight with balanced alignment, those problems diminished. After that incident, body use and care became an integral part of my daily routine and of every instructional program I have developed subsequently. Now I celebrate both my own successful and relatively pain-free career, as well as those of the practitioners I have trained.
Care, development, and protection of your hands and body are crucial for effectiveness and career longevity, no matter which bodywork or massage specialty you practice. Because of the stress of sustained pressures, practitioners of deep tissue, neuromuscular, structural integration, and other body therapies need to be especially mindful of:
- Appropriate choice and variety of tools utilized (i.e., elbow, fingertips, knuckles, etc.)
- Balanced alignment of the entire body and appropriate weight shifts to apply pressure
- Extra bracing and specific alignment of the entire pectoral girdle, including the elbow, finger joints, scapulo-thoracic, shoulder, and wrist
- Core stability and hand flexibility, dexterity, and strength
- Regular cleansing and maintenance
Body Alignment and Weight Shift
Table Size and Height
Endurance, focus, receptivity, relaxation, and strength in the hands result from effective use of the entire body. Proper table width and height are the first requirements to achieve efficient, stress-free body alignment. A 27″–30″ wide table will usually allow the client adequate room, while enabling most practitioners to shift their weight over the table without excessive leaning and strain to their backs. Choose a narrower table if you are short; however, you may then need side extensions or some other measure to accommodate larger clients’ arms.
Most practitioners work best with their table height adjusted so that, when standing erect and arms hanging loosely at the side, the tabletop touches between knuckles and wrist. This height encourages and allows for use of the lower body for pressure and weight shifting. It prevents the need for extreme knee bending or for muscling technique from the upper body. Of course, modify this rule for your body shape. When working with side-lying clients, the higher end of this range allows for the more horizontal weight shift involved. When working with heavier clients or using a contoured body cushion or other client positioners, adapt by lowering table settings.
Stance and Weight Shift
 Refer to image 1 as you apply the following guidelines. When standing beside a massage table, plant your feet firmly on the floor. Spacing your feet shoulders’ width apart and one foot ahead of the other by one to three foot lengths is usually best. Flex your knees. Don’t tire yourself with too deep a stance, but avoid limiting your weight shift and maneuverability with too shallow a stance. You can shift your body weight directly into your working tool if your torso is facing toward the point where you intend to apply pressure. The more direct the vector of pressure applied, the less energy required to achieve effective depth.
Think of your body’s center of gravity (in the lower abdomen) as a flashlight aimed as directly as possible at the structure you want to touch. Aligning your spine, with no excessive curvatures, rotations, or twists (especially of the lumbar and cervical areas), is crucial in minimizing stress and avoiding injury. Lengthen your entire spine, but maintain gentle curvatures. Lengthen your lower spine by imagining a weight attached to your coccyx, drawing it toward the ground. To lengthen the upper spine, imagine a hook at the crown of your head attached to the sky.
To get lower, bend at your hip joints or knees. Do not from your waist, which can strain your lower back. Notice and correct any collapse or side-bending of your head or torso. Look downward when you need to locate structures and monitor client reaction, then realign your head on your spine, reestablishing a gentle cervical curvature with your chin gently tucked in. In summary, weight shifting from the lower body is more efficient and comfortable (image 1). Upper body “muscling” of technique usually creates pectoral girdle and spinal collapse and pain (image 2).
Avoid side-bending head and upper body when clients are side-lying (image 3).
With balanced alignment, and the table at the proper width and height, you are ready to perform your technique, whether it will be a compression into a trigger point, effleurage, kneading, a passive joint movement, or a slow, melting deep-tissue sculpt. Gather your weight into your rear leg, emptying your front leg of weight, but allowing it to remain relaxed, resting on the floor. Initiate and maintain momentum by pushing into the ground with the rear leg, but do not lock that knee in doing so. Direct your weight into your working tool, and avoid loading your front leg, which should remain empty, relaxed, and free to step if needed. Increase pressure by pressing into the ground and lean more heavily onto your tool; lighten it by shifting subtly back into the rear leg. Release your pressure by regathering your weight into the rear leg. With each technique applied, push from the back leg into the area being compressed or stroked. Accomplish movements (such as many traction stretches) away from the client’s body and return effleurage by similarly shifting weight from front foot to back foot. Start traction moves with weight forward, then shift gradually to the rear leg (image 4).
For procedures (such as petrissage or some lomi lomi strokes) that require you to squarely face the side of the table, a “horse riding” stance is more efficient. In this stance, your feet are parallel to each other, at least as far apart as your shoulders’ width, and your knees are flexed. Weight shifting between the feet should power your arms for techniques. Allow your torso to rotate around your lower abdomen much like a washing machine agitator moves.
 Seated Work
When working in a seated position, plant your feet firmly on the floor. In this position, the actual weight shifts must result from your ischial tuberosities pressing into the stool or chair, thereby, functioning as the feet do when standing. Of course, always maintain spinal alignment with the head erect, and relax your shoulder girdle. Effective seated body use involves relaxed, erect alignment (image 5). Sustained side-bending and hunched shoulders can create both practitioner and client pain (image 6).
Upper Body Alignment
Relax all unnecessary contraction of the pectoral girdle muscles so that your shoulders remain down, balanced horizontally on the torso. Avoid hunching and anterior rounding of the shoulders when applying techniques. Pay particular attention to releasing excess tension in your levator scapulae, rhomboids, supraspinatus, and trapezius. Your biceps, deltoids, latissimus dorsi, pectoralis major, trapezius, and triceps will not be overused if you use your body weight efficiently to create pressure, rather than pushing from your arms. To stabilize your shoulder and scapulothoracic joints as you shift your weight into your client’s body, balance the functions of the serratus anterior/rhomboids and the latissimus dorsi/upper trapezius, along with the humeral stabilizers (i.e., infraspinatus, subscapularis, and teres minor).
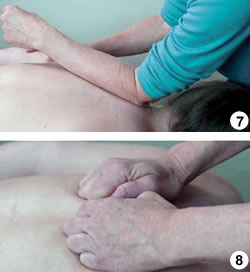
When the forearm or elbow is used, only the contraction of the elbow flexors is necessary; keep the forearm, hand, and wrist relaxed. Stabilize the shoulder and scapulothoracic joints in an open, balanced position, avoiding excessive humeral adduction or abduction, and let your shifted body weight be the source of pressure. Apply no pressure from the head, other hand, or the shoulder and back muscles. This will avoid strain to your upper extremity. You will also prevent possible injuries, such as bursitis, neuritis, rotator cuff syndrome, and tennis elbow. Relaxed arm, hand, and shoulder positions deliver deep, sensitive pressure (image 7).
Joint Protection
 Your hands need to perceive the needs of the tissue beneath. They perform fine, delicate movements as they direct energy and apply appropriate technique. They sustain the weight of your body as you apply compressions, kneading procedures, or stroking. They are the most important tools of your trade. You must protect the integrity of your elbows, fingers, and wrists. Whatever technique you apply, perform it with as much open, balanced alignment of these joints as possible. If you repeatedly hyperextend your wrist joint during deep palmar and hypothenar strokes, carpal tunnel syndrome, ligament strain in the wrist, and/or tendonitis can result.
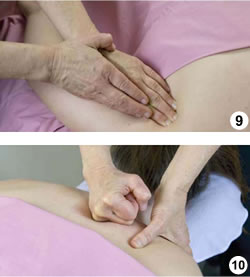
Avoid wrist hyperextension and overuse of the heel of the hand by effleuraging with soft-fisted knuckles whenever possible (image 8).
Excessive pressure on your fingertips, particularly on the thumbs, can hyperextend or hyperflex the metacarpal-phalangeal joint. The resulting ligament strain and stretching can cause instability, pain, and swelling in the affected joints. Avoid these problems by bracing or supporting your fingers and hands to create additional protection for the joints sustaining the greatest pressures. For example, the fisted hand can brace behind your thumb, or your other hand can act as a splint for the phalangeal joints when fingertip pressure is required.
Use one hand to apply pressure while the other stabilizes the working fingers (image 9).
Exclusive and/or improper use of any tool—but especially the fingertips, heel of the hand, or thumbs—can result in joint-structure damage. Reserve these tools for small areas, specific, definition-type work, and thinner, less-tense muscles. By regularly using alternative tools such as your elbows, forearms, and knuckles, you can sensitize them to nearly as fine a receptivity as your fingertips. Vary which tool you use throughout each session. Since the structure of the elbow and fisted hand are more capable of sustaining deep pressure without threat to joint integrity, use these tools for deepest pressures whenever possible. Carpal tunnel syndrome, irritation and inflammation of the joint capsule, osteoarthritis, and strained ligaments are all probable results of using one tool more than others or attempting to release large masses of muscle with smaller tools such as thumbs or fingertips. Fists are effective tools for denser muscles and when needing deeper pressures (image 10).
Developing Hand Strength
 Work with both left and right sides of your body so that both hands and arms are equally strong and agile. You can increase control, dexterity, and strength in your hands while enjoying the products and pleasures of activities like playing piano, guitar, or rhythm instruments; typing; or weed pulling. Other more structured exercises include:
- Fisting your hand, then rhythmically squeezing it tighter, moving from little finger to ring finger, and so on through the thumb, and repeating this sequence increasingly faster and for more repetitions as the hand develops.
- Placing a poker chip between two fingers and “walking” it to the next two fingers and back without using the other hand.
- Playing tossing games with first one poker chip, then as many as three, developing both one- and two-handed tossing and catching patterns.
- Pushing the fingertips of one hand against those of the other, either simultaneously, or from little finger through thumb in a rhythmic sequence.
- Rhythmically rolling three marbles or large steel ball bearings in your palm.
- Squeezing a firm ball, such as a tennis ball, or Power Putty, a product available in many athletic stores.
- Touching each fingertip to thumb-tip in a smooth, increasingly brisk rhythm.
 Core Body Stability—Pectoral Girdle
Proper alignment and balance of your pectoral girdle as it sustains much of your body weight is difficult without adequate upper body strength. Maintain a regular program of exercise, weight training, or other activities that target strength and flexibility in these muscles: biceps, latissimus dorsi, rhomboids, shoulder joint stabilizers, trapezius, triceps, and, most importantly, the serratus anterior. The serratus provide critical downward rotation of the scapula, stabilizing it and the rest of your shoulder girdle against the posterior driving force you create when leaning your body weight to massage.
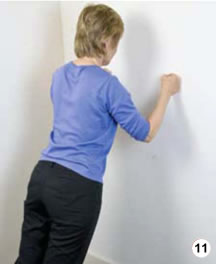
Most practitioners can easily incorporate daily push-ups to develop a foundation of pectoral girdle strength. If you cannot do a full push-up, then work toward that goal with progressively more strenuous push-up variations. Start by doing push-aways (image 11):
- Stand one to two feet from a wall or other sturdy, flat vertical surface.
- Place your palms or your fisted knuckles against the wall and lean onto them while sustaining a rigid position.
- Drop toward and then push your upper body away from the wall, maintaining alignment of your scapula against your back.
- Repeat for 12 repetitions. Rest and repeat 12 times. After several weeks of regular exercise, intensify the effort required by standing further and further from the wall, thereby taking more and more of your body weight onto your arms.
- Progress to the floor push-ups when you feel ready. Initially, hold your weight on your knees and hands, moving to standard military push-ups on toes and hands when your strength is sufficiently developed.
Pectoral girdle strengthening begins with push-aways and progresses to full push-ups.
Increasing Body Energy: A Tai Chi Exercise
Protect and strengthen your hands by increasing overall body energy and by learning to direct that energy through your hands. Traditional Asian disciplines such as tai chi chuan and qigong are notable for their effect in developing the body’s vital energy (chi). If experienced teachers in these arts are unavailable, video instruction can be helpful. Here’s a basic exercise from tai chi that you can do daily to generate more energy:
- Stand with your feet shoulders’ width apart and directly under your shoulders. Distribute your weight evenly between both feet and throughout each foot.
- Achieve a relaxed, bipolar extension of your spine—imagine a string attached to the crown of your head extending your spine upward toward the sky; at the same time, imagine a weight at your coccyx extending your spine downward toward the earth. Let your arms hang loosely at your sides.
- Maintain this upright and extended alignment of your spine throughout the exercise.
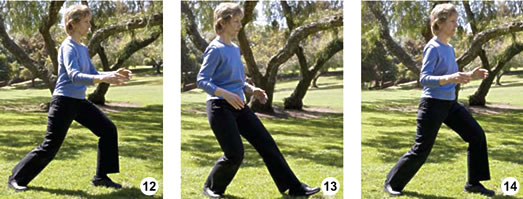
- Gradually bend into your knees. Step straight ahead with your left foot, placing it, with the toes pointing straight ahead, one or two foot-lengths ahead of the right. Shift 70 percent of your weight forward into your left foot. Turn the toes of your right foot outward to a 45° angle. Your torso should be facing ahead. This position is called the Bow Stance in tai chi, and it is recommended as your initial stance at table side (image 12).
- Bend your arms at the elbows to a 90° angle, and let your palms face each other as if holding a beach ball in front of your abdomen. Relax any shoulder tension.
- As you gradually shift 100 percent of your weight back into your right leg, begin creating a circle in front of your abdomen by moving your arms down and back. Inhale gently and fully from your lower abdomen (image 13).
- As you gradually shift your weight forward 70 percent into your left leg, continue the circular movement of your arms up and forward. Exhale gently and fully from your lower abdomen. The full circle of your arms also will be about beach-ball size (image 14).
- Continue the slow, coordinated movement of your weight and torso with the circular movement of your arms for two to five minutes.
- Repeat the exercise with your right foot forward.

Regular Maintenance
As you already know, clip and file your nails regularly, and keep your hands clean, smooth, and free of calluses and rough spots. Protect your hands with gloves when gardening, using harsh cleaners, or doing manual labor. In addition, self-massage of your hands is invaluable for keeping them free of tension. Use deep, melting compressions of the muscles down to the bone; eliminate trigger points; and wring and strip any accumulated tension from your hands and forearms daily or, at least, weekly.
Use post-event sports massage techniques for any stressed areas of the arms, hands, and pectoral girdle. Increase and clarify energy flow in your hands by regularly and systematically sculpting and stripping each fingertip, including anterior, posterior, and nail surfaces.
Attentive care of your hands is as crucial for effectiveness and vitality of your trade as is advanced or specialized skill enhancement. Avoid debilitating injuries and discomfort by maintaining proper body alignment and extra support for your joints; increasing core, pectoral girdle and hand strength; using a variety of tools; and maintaining your hands regularly. You’ll likely have a longer, more pain-free career as a result.
[minti_divider style=”1″ icon=”” margin=”60px 0px 60px 0px”]
Carole Osborne-Sheets is the author of and Pre- and Perinatal Massage Therapy, and a contributor to the upcoming textbook Teaching Massage Therapy, as well as numerous other publications. She is the 2008 recipient of the AMTA Jerome Perlinski National Teacher of the Year Award. The work outlined in this article is adapted from portions of the author’s textbook Deep Tissue Sculpting.
